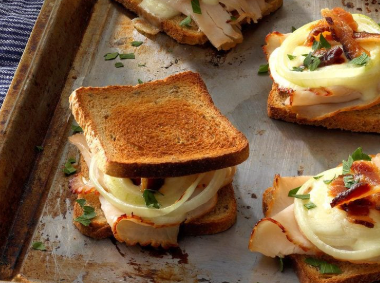
Recipes

Fall Recipe for those apple lovers

Fall means apples here in Wisconsin. From the apple orchards and events, it just brings on all the good feelings of warm apple pies.

I hope you take time to enjoy the fall season and get some time outside. It can be good for the soul! 


Apple Butter🍎

So good on toast, drizzled over oatmeal, fruit and added to a charcuterie board, or as a sauce for grilled pork chops. Be creative! 


Ingredients
4 pounds apples (Cortland, Liberty, Sweet 16, Pink Lady, and Honeycrisp are great options)
2 cups water
1 3/4 cups organic cane sugar
2 teaspoons cinnamon
1/2 teaspoon ground cardamom (If you unable to find this at the store, you can add more cinnamon, or ground cloves would be good as well) 


Core and peel apples. Cut apples into quarters.

Combine apples and water in a large saucepan. Cook apples at a simmer until soft. Puree mixture using a food mill or high-speed blender. (Use a towel over the lid, vent it if possible as it causes steam, and start on the lowest setting before increasing speed. For the safest method, use a handheld immersion blender directly in the pot.
Return apple pulp to the saucepan. Add sugar and spices, stirring until sugar dissolves. Cook at a gentle boil over medium heat until the apple mixture is thick enough to mound on a spoon, stirring frequently to prevent sticking. Remove from heat.


Ladle into half pint jars, or a glass container and this will store in your frig for a good two weeks, but I don't imagine it being around that long. 


If you like to can here are instructions for a water bath canning to have this butter for a much longer period of up to a year stored in a pantry until opened. 

Ladle hot apple butter into a hot jar leaving a ¼ inch headspace. Remove air bubbles. Wipe jar rim. Center lid on jar and apply band, adjust to fingertip tight. Place the jar in a boiling water canner. Repeat until all jars are filled.
Process jars 15 minutes, adjusting for altitude. Turn off heat, remove lid, let jars stand for 5 minutes. Remove jars and cool for 12-24 hours, listen for the pop to know they are sealed. Check lids for seal 12 hours later, they should not flex when center is pressed. Next step is feeling accomplished and feeling darn good looking at your final product. 

.

Crafts

Pressed Leaf Sun Catchers: A Simple Fall Craft with Big Autumn Magic


Some crafts just feel like fall, warm light, crunchy leaves, that golden afternoon glow. Pressed Leaf Sun Catchers bring all of that right to your windows. They’re ridiculously easy to make, budget friendly, and kid approved, but they also look surprisingly elegant when the sunlight shines through.

Whether you need a homeschooling craft or are decorating for a fall party, this one is a winner.


What You’ll Need

~Pressed autumn leaves (collect them on a walk, then press between books or with a flower press)

~Clear contact paper or laminating sheets

~Scissors

~String, twine, or ribbon for hanging

~A hole punch (optional)


How to Make Pressed Leaf Sun Catchers

  1. Gather your leaves
    Collect leaves in every shape and color: reds, oranges, yellows, even a few stubborn green ones. Press them for a couple of days until flat and dry.
  2. Sandwich and seal
    Place a sheet of clear contact paper sticky side up. Arrange your pressed leaves however you’d like: layered, scattered, or in a pretty pattern. Top with another sheet of contact paper to seal them in.
  3. Cut your shapes
    Use scissors to cut circles, leaf shapes, or even pumpkins and hearts. (If you’re working with kids, tracing around bowls, lids, or cookie cutters helps create neat shapes.)
  4. Hang and enjoy
    Punch a hole at the top, thread ribbon or twine through, and hang your sun catchers in the window. As the afternoon light streams in, the leaves glow like little stained-glass masterpieces.


Print

Book Recommendation 

Can You Hear The Trees Talking?: Discovering the Hidden Life of the Forest  by Peter Wohlleben


WINNER OF THE AAAS/SUBARU PRIZE FOR EXCELLENCE IN SCIENCE BOOKS

BASED ON THE 
NEW YORK TIMES BESTSELLER THE HIDDEN LIFE OF TREES 

This interactive and illustrated book for kids and/or adults introduces the wonderful science of the forest through outdoor activities, quizzes, fun facts, photographs, and more!


Discover the secret life of trees with this nature and science book for kids: 
Can You Hear the Trees Talking? shares the mysteries and magic of the forest with young readers, revealing what trees feel, how they communicate, and the ways trees take care of their families. The author of The Hidden Life of Trees, Peter Wohlleben, tells kids about the forest internet, aphids who keep ants as pets, nature’s water filters, and more fascinating things that happen under the canopy.

Featuring simple activities kids can try on their own,
 along with quizzes, photographs, and more, Can You Hear the Trees Talking? covers a range of amazing topics including:

  • How trees talk to each other (hint: through the wood wide web!)
  • Why trees are important in the city
  • How trees make us healthy and strong
  • How trees get sick, and how we can help them get better

This engaging and visually stunning book encourages learning and fun as kids discover the wonder of the natural world outside their windows.


"Lush full-color photos and pictures create an immersive experience and the layout facilitates engaged, delighted learning. ...this book may prompt frequent family visits to, and a new appreciation for, neighborhood trees and local forests.”

Washington Parent


Seasonal Tips

Here are seasonal apartment tips to help you maintain a comfortable and efficient living space throughout the year:

Fall 🍂
Check Heating Systems – Test radiators or furnaces before temperatures drop.
Prepare for Shorter Days – Add cozy lighting like lamps or string lights.
Organize Seasonal Clothes – Swap summer wear for warmer layers.
Inspect Windows & Doors – Look for drafts and consider using weather stripping to keep warm air in.
Stock Up on Essentials – Have blankets, tea, and cold-weather gear ready.


Pointers for Moving

Before the Move:

  1. Read Your Lease Carefully – Understand your lease terms, including security deposits, move-in dates, and any restrictions.
  2. Notify Current Landlord – Give proper notice as required in your lease to avoid penalties.
  3. Create a Moving Checklist – List all tasks, such as packing, hiring movers, and updating your address, turning on/off utilities. 
  4. Set a Budget – Account for moving costs, security deposit, utility setup fees, and other expenses.
  5. Declutter Before Packing – Donate, sell, or discard items you no longer need to lighten your load.
  6. Gather Packing Supplies – Collect boxes, tape, bubble wrap, and markers for labeling.
  7. Label Everything – Clearly mark boxes by room and contents to make unpacking easier.
  8. Take Photos of Your Current Apartment – Document any damages before moving out to ensure you get your security deposit back.


Moving Day:

  1. Pack an Essentials Box – Include toiletries, clothes, chargers, and important documents for easy access.
  2. Use Proper Lifting Techniques – Avoid injuries by lifting with your legs and not your back.
  3. Check Apartment Condition – Inspect your new place for damages and report them to the landlord immediately by filling out the "Move In Inspection/Acceptance Form" and take pictures of damage you note to retain until you vacate the unit. 
  4. Confirm Utility Setups – Ensure water, electricity, internet, and other services are active.
  5. Meet the Neighbors – Introduce yourself to start on a positive note in your new community.


After the Move:

  1. Unpack Strategically – Start with essentials, then move on to other rooms gradually.
  2. Change Your Address – Update it with your bank, employer, subscriptions, and DMV.
  3. Test Appliances and Fixtures – Check if everything is working properly and report issues to your landlord.
  4. Secure Your Home – Check locks on doors and windows to confirm they work properly, check smoke detectors, and familiarize yourself with emergency exits.
  5. Decorate and Organize – Make the space feel like home by arranging furniture and adding personal touches.


Most importantly, take your time, have fun and reach out to your property manager with any questions, or concerns, you have as you acquaint yourself with your new home.